
Overview

This guide will walk you through implementing OAuth2 device authorization for console users, allowing them to log in to your game using their Discord account. By following this guide, you will learn how to:
  • Initiate OAuth2 device authorization
  • Handle user authentication via QR codes or manual entry
  • Exchange the device code for an access token
  • Implement automatic token handling with the SDK

Prerequisites

Before you begin, make sure you have:
  • Read the Core Concepts guide to understand:
    • OAuth2 authentication flow
    • Discord application setup
    • SDK initialization
  • Set up your development environment with:
    • Discord application created in the Developer Portal
    • Discord Social SDK downloaded and configured
    • Basic SDK integration working (initialization and connection)
To use the Discord Social SDK in your console games, you will need to request middleware approval and be an approved developer for the target console. Check out this article to learn more.
If you haven’t completed these prerequisites, we recommend following the Getting Started guide.

OAuth2 Device Authorization Flow

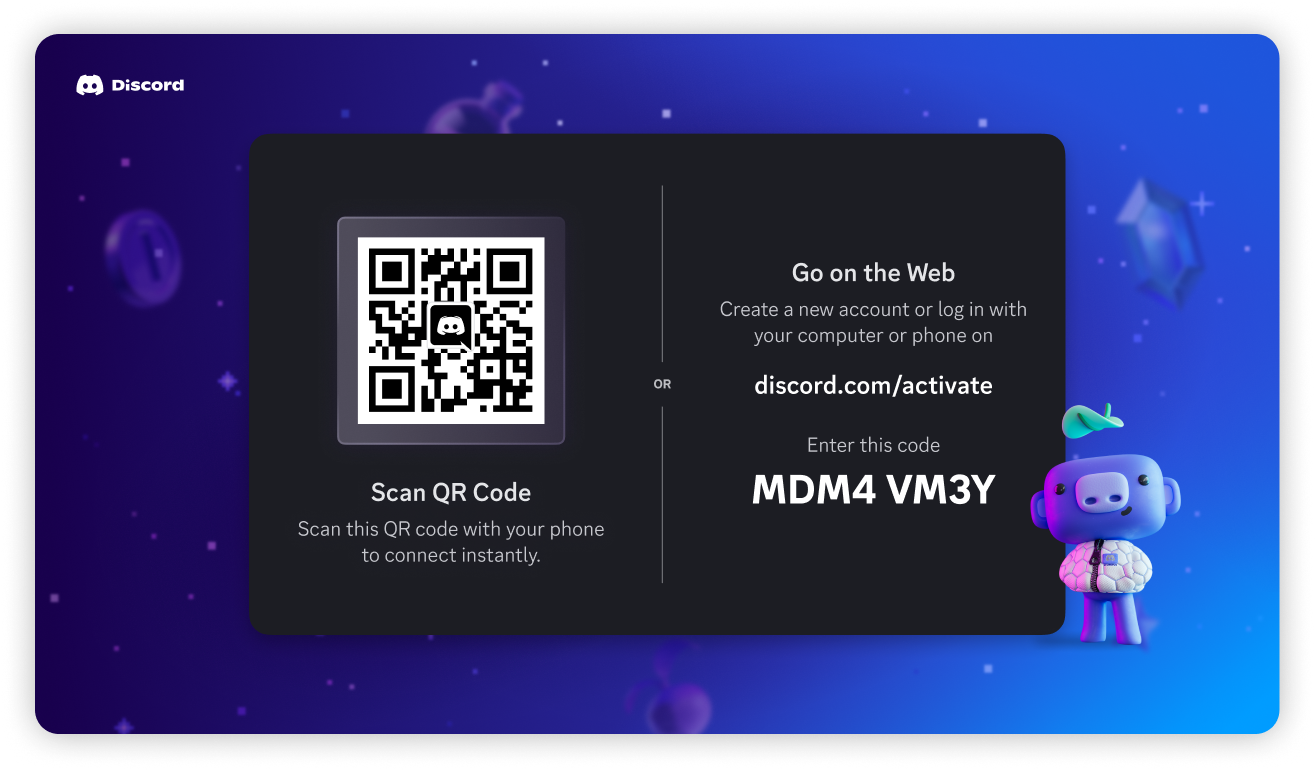
Console users cannot authenticate via a web browser. Instead, they follow these steps:
  1. The game requests a device code from Discord
  2. To approve the authorization request, The user scans a QR code or enters a user code at discord.com/activate.
  3. Your game polls the Discord API to exchange the device code for an access token.
The SDK can manage this process automatically or allow manual token handling.
The OAuth2 flow requires a user’s account to be verified
Authorization screen from using OpenAuthorizeDeviceScreen and GetTokenFromDevice

Automatic Token Handling

This method requires enabling Public Client for your app. Most games will not want to ship with this enabled. Learn more
The SDK automates all of the OAuth2 device authorization flow steps with a single call to Client::GetTokenFromDevice. This method will handle the entire authorization process, including polling for the access token. Once you have the access token, you can authenticate the user with Client::UpdateToken and call Client::Connect to establish a connection with Discord.
discordpp::DeviceAuthorizationArgs args{};
args.SetClientId(APPLICATION_ID);
args.SetScopes(discordpp::Client::GetDefaultPresenceScopes());

client->GetTokenFromDevice(args, [client](
  discordpp::ClientResult result,
  std::string accessToken,
  std::string refreshToken,
  discordpp::AuthorizationTokenType tokenType,
  int32_t expiresIn,
  std::string scope) {
    if (result.Successful()) {
      std::cout << "🔓 Access token received! Establishing connection...\n";
      client->UpdateToken(discordpp::AuthorizationTokenType::Bearer, accessToken, [client](discordpp::ClientResult result) {
        client->Connect();
      });
    } else {
      std::cerr << "❌ Failed to get token from device \n";
    }
  });

Manual Flow for Console Authorization

If you plan to handle console authorization manually, you can follow these steps to authorize a user. We’ll be following the same OAuth2 device authorization flow as the automatic method, but you’ll need to manually handle the polling and token exchange.
  1. Request a device code from Discord
  2. Display the user verification information or open the authorization screen (optional)
  3. Poll for the user’s authorization
  4. Exchange the device code for an access token
  5. Handle the token response and close authorization screen (optional)

Step 1: Request a Device Code from Discord

Your game must request a device and user code from the Discord API.
import requests

API_ENDPOINT = "https://discord.com/api/v10"
CLIENT_ID = "YOUR_CLIENT_ID"
CLIENT_SECRET = "YOUR_CLIENT_SECRET"
SCOPE = "sdk.social_layer"

def authorize_device():
    data = {"scope": SCOPE}
    headers = {"Content-Type": "application/x-www-form-urlencoded"}
    
    response = requests.post(f"{API_ENDPOINT}/oauth2/device/authorize", data=data, headers=headers, auth=(CLIENT_ID, CLIENT_SECRET))
    response.raise_for_status()
    return response.json()

Example Response

{
  "device_code": "<device code>",
  "user_code": "<user code>",
  "verification_uri": "https://discord.com/activate",
  "verification_uri_complete": "https://discord.com/activate?user_code=<user code>",
  "expires_in": 300,
  "interval": 5
}

Step 2: Display Authorize Screen with QR Code and User Code

To open an authorization screen after requesting the user code, use Client::OpenAuthorizeDeviceScreen.
client->OpenAuthorizeDeviceScreen(user_code);
You can also display the verification_uri_complete or verification_uri with user_code in your game’s interface to allow the user to enter the code manually.
Authorization screen from using OpenAuthorizeDeviceScreen and GetTokenFromDevice Once the user approves the authorization request from a web browser or their mobile device, the device_code from Step 1 is ready to be exchanged for an access token.

Step 3: Poll for User’s Authorization

While the user completes the authorization request, your game must poll the Discord Oauth2 token endpoint to exchange the device code for a valid access token. You should poll this endpoint using the provided interval until the code expires after expires_in or succeeds. These values are available from the Authorize response above. If the code expires, you’ll want to start over with a new authorization request or cancel the authorization.

Step 4: Exchange Device Code for Access Token

Once the user completes authentication on Discord, your game must exchange the device code for an access token.
def exchange_device_code(device_code):
    data = {
        "grant_type": "urn:ietf:params:oauth:grant-type:device_code",
        "device_code": device_code
    }
    headers = {"Content-Type": "application/x-www-form-urlencoded"}
    
    response = requests.post(f"{API_ENDPOINT}/oauth2/token", data=data, headers=headers, auth=(CLIENT_ID, CLIENT_SECRET))
    response.raise_for_status()
    return response.json()

Step 5: Handle Token Response

Once exchanged, the API returns an access token to be used with Client::UpdateToken and Client::Connect to start using Discord Social SDK features.

Example Response

{
  "access_token": "<access token>",
  "token_type": "Bearer",
  "expires_in": 604800,
  "refresh_token": "<refresh token>",
  "scope": "sdk.social_layer"
}
If you followed the manual flow, you’ll need to call Client::CloseAuthorizeDeviceScreen to close the authorization screen.

Example for Manual Token Authorization

Here is an example of implementing the manual authorization flow in Python.
import requests
import json
import time

API_ENDPOINT = 'https://discord.com/api/v10'
CLIENT_ID = 'YOUR_CLIENT_ID'
CLIENT_SECRET = 'YOUR_CLIENT_SECRET'
SCOPE = 'sdk.social_layer'

def authorize_device():
  data = {
    'scope': SCOPE
  }
  headers = {
    'Content-Type': 'application/x-www-form-urlencoded'
  }
  r = requests.post('%s/oauth2/device/authorize' % API_ENDPOINT, data=data, headers=headers, auth=(CLIENT_ID, CLIENT_SECRET))
  r.raise_for_status()
  return r.json()

def exchange_device_code(device_code):
  print("Attempting to exchange device code for access token...")
  data = {
      "grant_type": "urn:ietf:params:oauth:grant-type:device_code",
      "device_code": device_code
    }
  headers = {"Content-Type": "application/x-www-form-urlencoded"}
    
  r = requests.post('%s/oauth2/token' % API_ENDPOINT, data=data, headers=headers, auth=(CLIENT_ID, CLIENT_SECRET))
  r.raise_for_status()
  response = r.json()
  return r.json()

def poll_token_exchange(device_code, interval, expires_in):
  start_time = time.time()
  
  while time.time() - start_time < expires_in:
    try:
      print("Checking for authorization...")
      result = exchange_device_code(device_code)
      return result
    except requests.exceptions.HTTPError as e:
      if e.response.status_code == 400:
        # Authorization is pending, wait and try again
        print(f"Waiting {interval} seconds for user to authorize...")
        time.sleep(interval)
      else:
        # Some other error occurred
        raise e
  
  raise Exception(f"Authorization timed out after {expires_in} seconds")

# Step 1: Get device authorization details
device_auth = authorize_device()

# Step 2: Display authorization details to user
print("\nPlease visit:", device_auth["verification_uri_complete"])

# Step 3: Poll for token exchange
try:
    access_token = poll_token_exchange(
        device_auth["device_code"],
        device_auth["interval"],
        device_auth["expires_in"]
    )
    print("\nSuccess! Access Token:", access_token["access_token"])
except Exception as e:
    print("\nError:", str(e))

# Step 4: Use the access token with discordpp::Client::UpdateToken and discordpp::Client::Connect

Working with Tokens

Once you receive the player’s access and refresh tokens, you can set the access token in the SDK with Client::UpdateToken. At this point, you’re authorized and ready to use Client::Connect.
client->UpdateToken(discordpp::AuthorizationTokenType::Bearer, accessToken, [client](discordpp::ClientResult result) {
  client->Connect();
});
You’ll want to store the access and refresh tokens for the player to use in future sessions. Please note that access_token values do expire. You’ll need to make use of the refresh_token to refresh the player’s token, which is covered under Refreshing Access Tokens.

Next Steps

Now that you’ve successfully implemented account linking with Discord on a console, you can integrate more social features into your game. Need help? Join the Discord Developers Server and share questions in the #social-sdk-dev-help channel for support from the community. If you encounter a bug while working with the Social SDK, please report it here: https://dis.gd/social-sdk-bug-report

Change Log

DateChanges
March 17, 2025Initial release