If you are developing an app for the first time, the commands documentation may be a more helpful resource for you.
@mentions their bot user (since there is clear user intent that the bot can read those messages).
And for apps that use message content in ways that can’t be ported to commands, you should review the message content intent review policy to see if you’re eligible to apply for the privileged intent.
Types of Commands
There are three types of application commands: slash commands, user commands, and message commands. When building your app, whether migrating or starting from scratch, consider which type of command(s) makes sense for a given feature of your app.Slash Commands
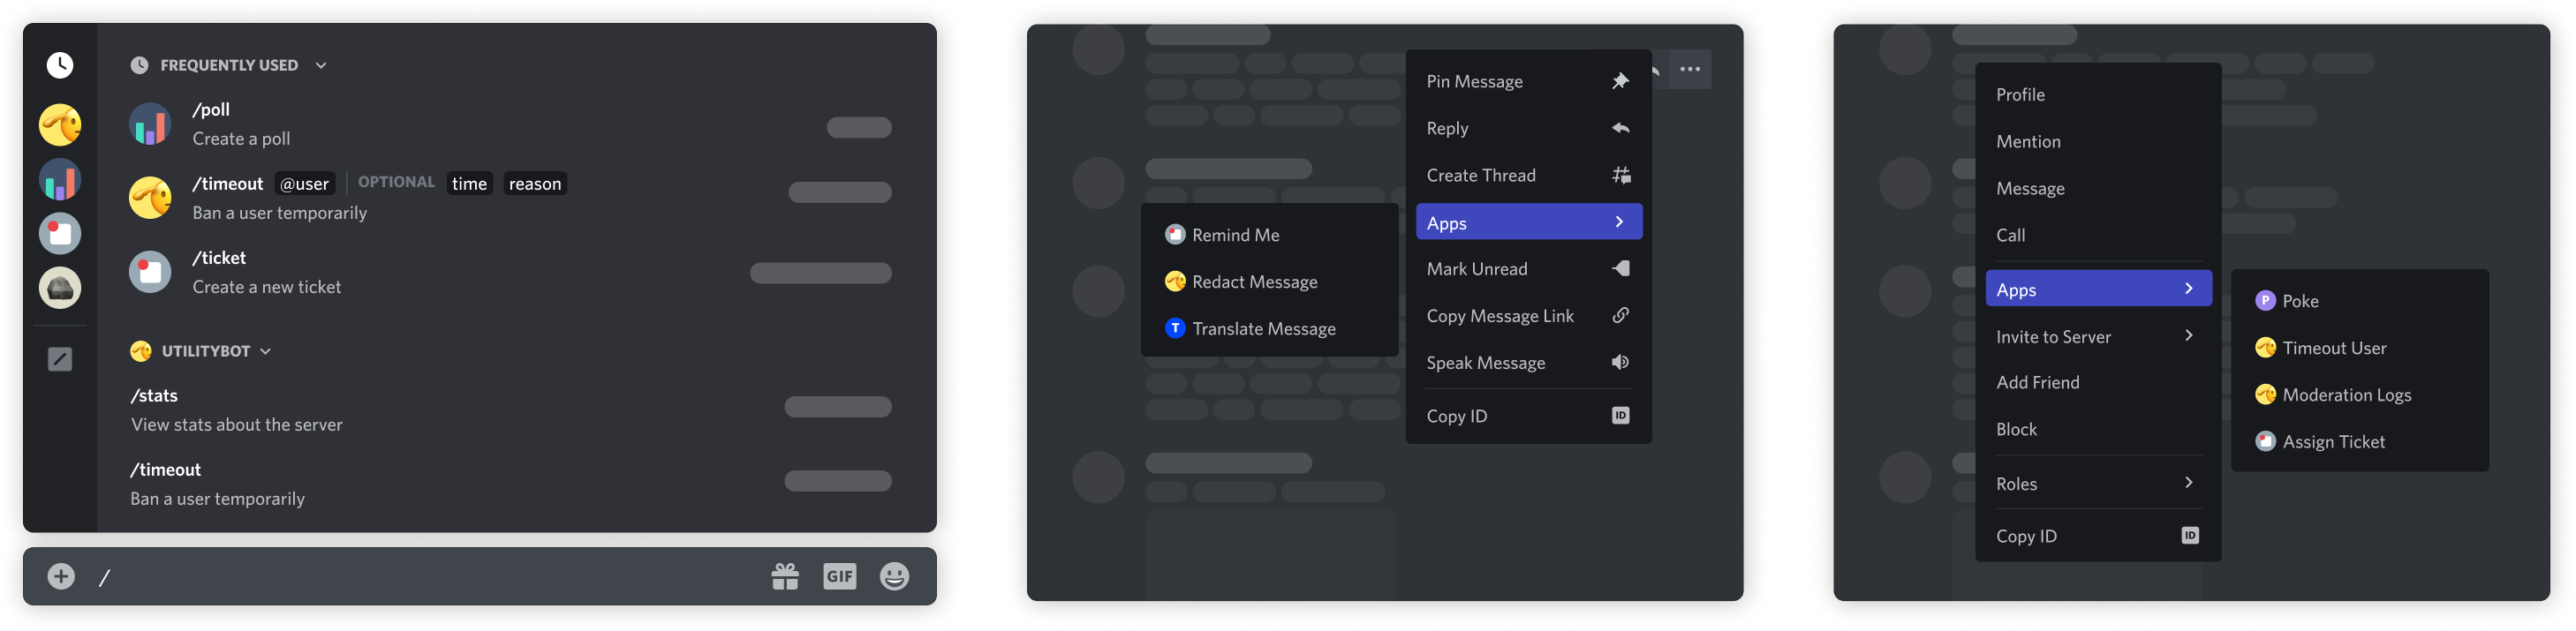
Slash commands are the most common type of command. They are accessed by typing a forward slash (/) followed by the command’s name, or by using the plus button (+) to the left of the message input.
Slash commands can appear in channels and DMs, so they’re helpful when an action is tied to a channel, a server, or nothing at all.
User Commands
User commands are in the context menu for users, which is accessed by right-clicking or tapping on any user. They’re helpful when an action is tied to an individual user, like a moderation app adding a timeout to someone.Within the context menus for users and messages, the
Apps submenu will only appear if an app in that server has installed a corresponding command (whether or not an individual user can use the installed command).Message Commands
Message commands are in the context menu for messages, which is accessed by right-clicking on a message, or by clicking on the ellipses at the top-right of a message. They’re helpful when an action is tied to a message, like creating a reminder to reply to a message the following day.After This Section
- Start thinking about how different app features might map to the different types of application commands.
Registering Commands
Commands can be registered via HTTP requests after an app is authorized with theapplications.commands scope. The applications.commands scope is also automatically included when an app requests the bot scope.
There is a section on designing commands below implementation details that may be helpful as you start mapping out different commands
- Global commands are available in all of the servers where your app is installed, and can be created using the
/applications/{YOUR APP ID}/commandsendpoint. All of your app’s global commands will automatically be added to the servers your app is installed in, regardless of whether they were registered before or after installation. - Guild commands are only available in the servers you explicitly add them to via the API, making them useful for features available only to a subset of guilds. They can be created using the
/applications/{YOUR APP ID}/guilds/{A GUILD ID}/commandsendpoint.
Using Options as Parameters
Command options is an optional field (options) that can be defined when creating commands. When used, options will display for the user to fill out during invocation. You can also provide dynamic option suggestions using the autocomplete field. Read more about options in the documentation.

Using Subcommands to Group Actions
Subcommands and subcommand groups help organize commands that are related to a shared resource or action. Instead of several top-level commands (like/add-resource and /delete-resource), you can have one top-level command with several subcommands (like /resource add and /resource delete).
Subcommands use the same options field as passing parameters, but with a type of 2.
Restricting Command Use
Application command permissions allow users and apps to restrict command usage in a server. When commands are restricted for a user, they won’t appear for them in the client. If your app currently relies on permissioning, using command permissions can be a way to port them. It also cleans up the command picker UI for users, making it easier for them to find your app’s commands that are most relevant to them.Example Payload
Below is a sample payload to create a global slash command with an optional parameter:Default Permissions
When creating or updating a command, you can use thedefault_member_permissions field to restrict the command to a set of bitwise permissions that reflect the default permission flags a user must be granted in order to use the command.
In addition, the dm_permission flag can be used to control whether a global command is available in DMs (not available for guild commands).
Updating Permissions
Permissions for specific roles, users, and channels can be updated by your app if you have theapplications.commands.permissions.update scope and a Bearer token that’s authenticated by a user with the necessary user permissions. Details about updating a command’s permissions are in the documentation.
After This Section
- Update your app to use the
applications.commandsscope - Decide whether each of your commands should be scoped globally (available to all servers) or to a guild (available to specific servers)
- Decide what permissions your commands may need to run
- Create your app’s commands using HTTP endpoints
Handling Commands
Commands use the interactions model through HTTP-based outgoing webhooks or the WebSocket-based Interaction Create gateway event. Regardless of the transit method used to arrive, your app will receive relevant information when a Discord user triggers one of your app’s interactions. For commands, this means that each time one of your commands is used, your app will receive information like the command name and the user who triggered it. More information about this information is below in the section on parsing command payloads.Adding an Interactions Endpoint URL
This step is specific to receiving interactions over HTTP. If you prefer to use the Gateway, this step won’t be applicable to your app.
- Responding to
PINGevents: When you save a URL in your settings, Discord will send aPOSTrequest withtype: 1. To acknowledge this request (and thus verify your endpoint), you should return a200response with a payload containingtype: 1. More information can be found in the Receiving an Interaction documentation. - Verifying request signatures: To ensure that requests are coming from Discord, your endpoint must verify each request using the included headers, specifically
X-Signature-Ed25519andX-Signature-Timestamp. If the signature fails validating, your app should return a401response. More information and example code can be found in the Security and Authorization documentation.
Many libraries on the Community Resources page simplify verification and interaction request handling by exporting reusable functions and/or handling it automatically.
PING requests, you can add your Interaction Endpoint URL by navigating to your app settings from the developer portal. On the General Information page, you’ll see a field for your Interactions Endpoint URL.
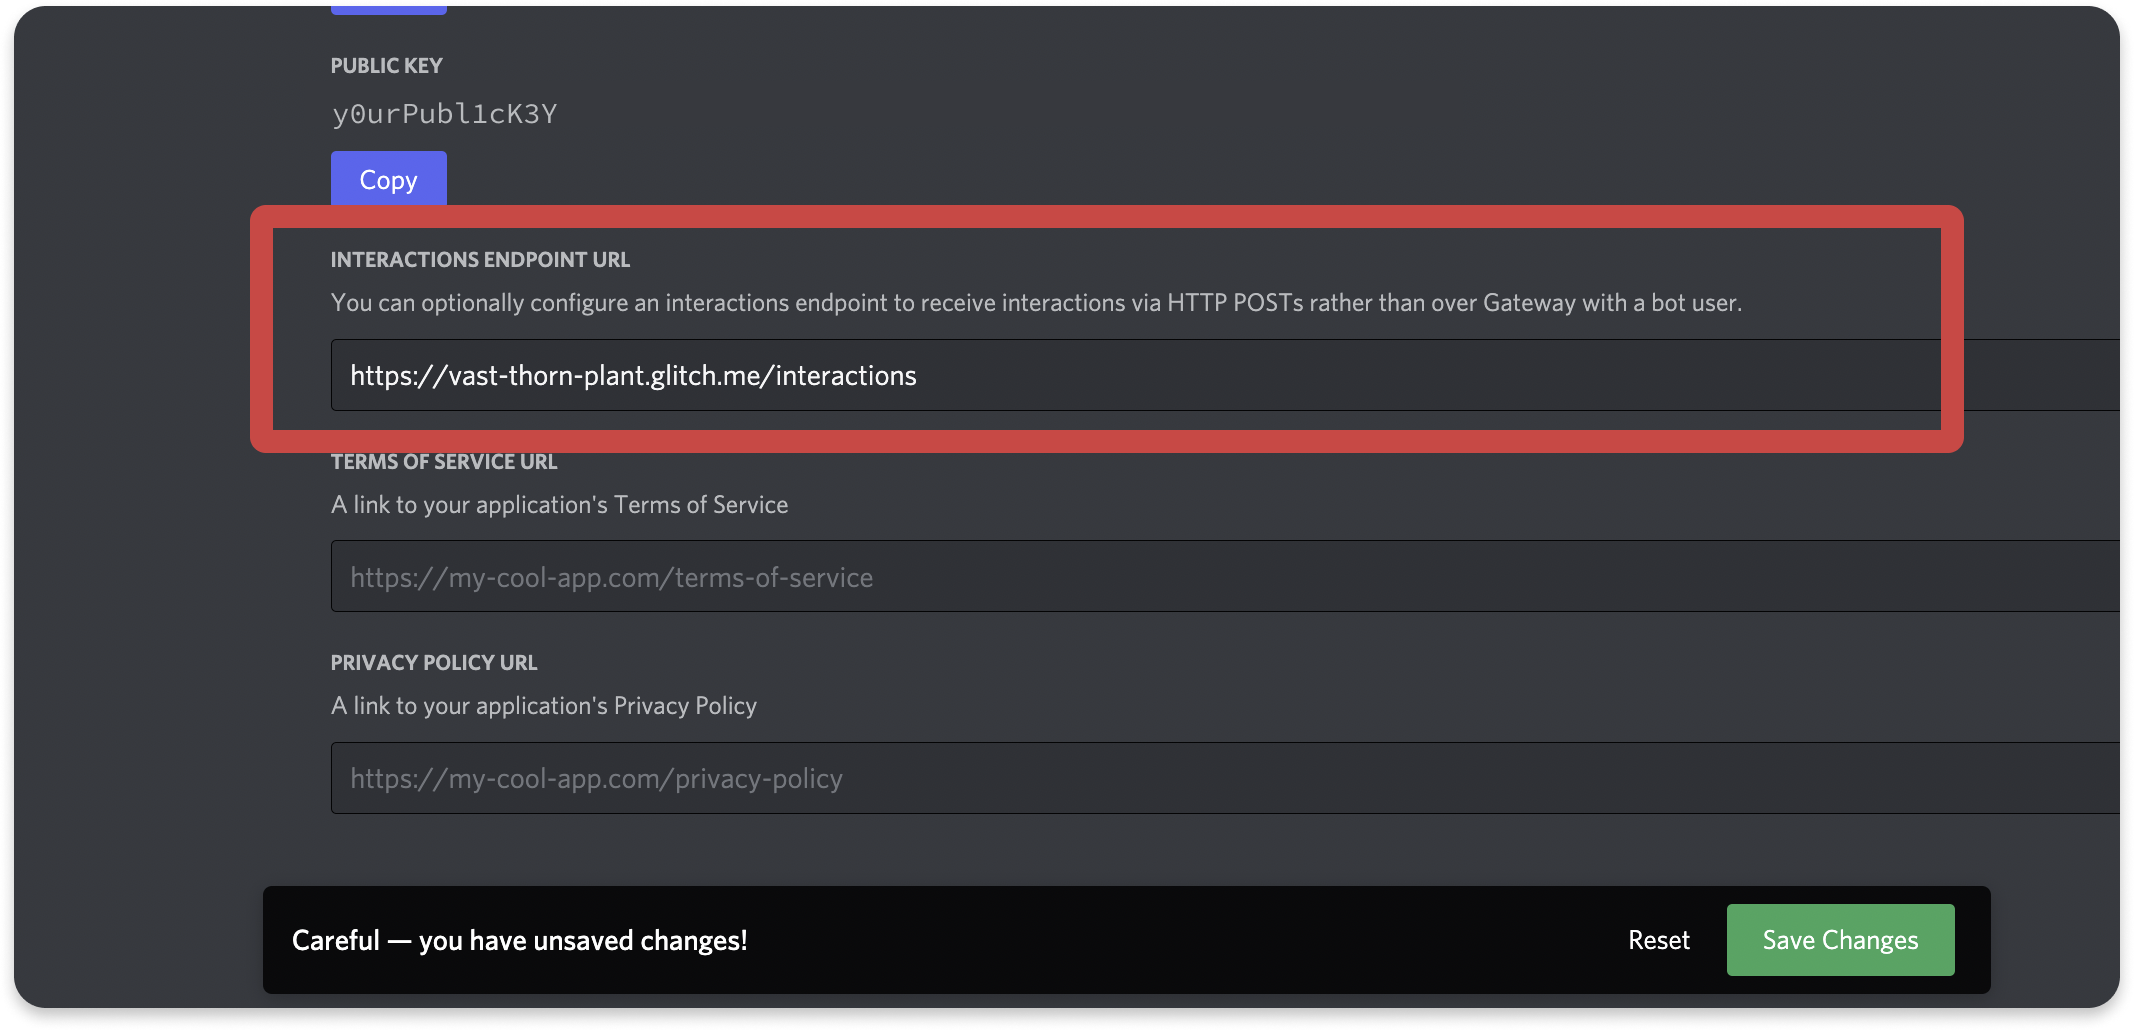
PING requests.
Parsing Command Payloads
Once your app has a verified endpoint, you should start being able to receive command requests from Discord. As mentioned above, these include information relevant to handling the command like its name, the user who invoked it, and the guild and channel it was invoked from. It also includes additional details that could be relevant, like the command options or locale information. Since slash commands (CHAT_INPUT commands) are run in the context of a channel, you’ll notice that their payloads don’t contain any information about specific messages. If your app needs the message content, you can use message commands which do include the message content.
In the getting started guide’s repository, there’s a code sample showing how to create and handle commands using JavaScript.
data object which contains all of the command-specific information (including any options a user selected). Details about the full interactions object your app receives can be found in the Interactions documentation.
After This Section
- Setup a public endpoint for your app that verifies request signatures and responds to
PINGevents - Add your endpoint to your app settings under Interactions Endpoint URL
- Modify your code (or write new code) to handle the different commands you registered earlier
Designing for Commands
Adding commands to your app can add discoverability and interactivity for users. While porting your app’s features, it’s worth considering how your app will be seen and used inside of the client. This section includes a handful of areas to consider when designing your app’s commands, and what happens after they’re invoked.CLIs (Command Line Interfaces) can be a helpful analogy when designing Discord commands, their options and subcommands, and how it all fits together into one experience. A good resource for this can be the open source Command Interface Guidelines.
Choosing a Name
When creating a command, keep the name short and relevant. The name of the command should give users an idea of the action they’re invoking. A description can be a bit more verbose, leaving room to be more explicit about the action and its result. And when your app has several commands (and perhaps subcommands), it’s important to keep the naming scheme consistent.Examples
- You should use a descriptive name like
/statsrather than a vague name like/getfor a command that displays stats to a user. - You should use shorter name like
/pollrather than a verbose name like/create-new-pollfor a command that creates a new poll. If there are many actions to take related to/poll, it might be more intuitive to use acreatesubcommand.
Collecting User Input
When commands need a bit of input from a user, you can use theoptions field. Command options can be thought of as parameters to your command. They can be one of many types, like the standard string or number, or the more Discord-specific role, user, and channel.
Options are great for short input, but if you need user input that’s longer than a couple of words, like a title or description, you can collect form-like input using modals as a response to the command invocation.
Scoping a Command
Commands can optionally be scoped to specific guilds, rather than available everywhere your app is installed. Guild commands can be useful when your app has functionality that may not be relevant to all servers like:- When a command is in development
- When a specific command is opt-in or opt-out
- When specific commands are behind a paywall
Responding to a Command
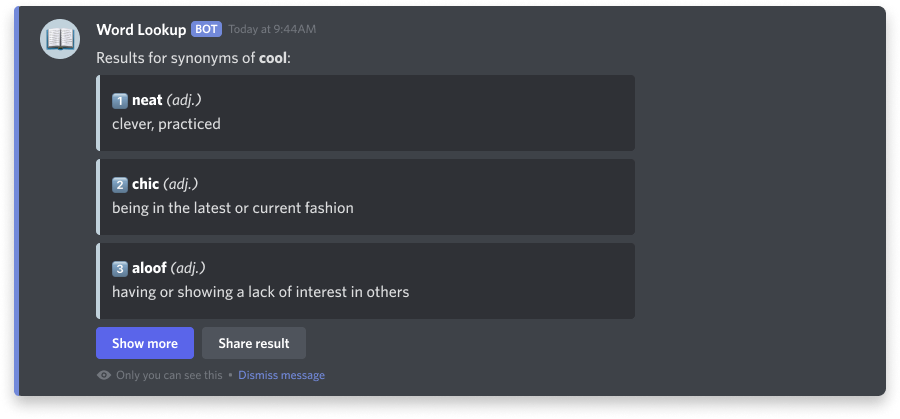
Interactions (including commands) can have a hand-picked reply using one of the many available interaction responses. The specific response type should be picked based on the situation. Some commands may call for sending a message back to the channel where the command was invoked from, or perhaps just to the specific user who ran the command (for this, the ephemeral message flag can be used). Other commands may necessitate descriptive input from the user, in which case responding with a follow-up modal with text inputs might make the most sense. Regardless of the response, it should be picked based on the specific interaction the user is taking.Example
For a/search command that searches an external service, an app could respond with an ephemeral message rather than posting back into the channel where users may not have context or want messages cluttering the channel.
Ephemeral messages can also contain message components, so when relevant, there could be a button to share the information in the ephemeral message to a channel.
Onboarding Users
Once you’ve implemented slash commands (or really any feature for your app), it can be helpful to onboard existing and new users. While every app on Discord is unique, this section tries to generalize some good onboarding strategies, specifically to send updates to existing users.Communicating App Updates to Users
When you add new features or make major changes to your app, communicate what they are and how it specifically affects them. What do they need to do differently? What improves? What won’t they be able to do anymore? As to where to communicate the changes, you can start with any communication channels you own—a support server, blog, or social media account for example. You can also inform users about changes within the servers your app is installed in as long as it’s done in a non-intrusive way. If your app has a dedicated channel in posts, that would be a good place.Example
The following is an example of an app update that may be sent to communicate the new way to access commands. Depending on the different features your app adopts (like options, subcommands, permissions, etc.), an update message or changelog entry will look very different.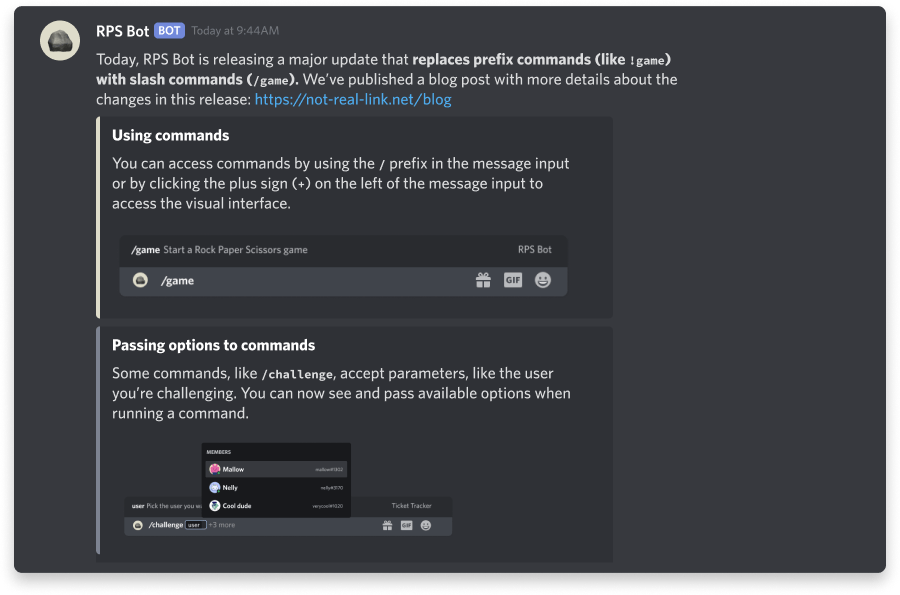
Making Help Available
Both new and existing users should always have ways for them to easily find usage instructions and support. Some of this help can come in the form of a support server or website, but you should also have instructions in the client. This can come in the form of a specific command that shows app usage, a message when someone@mentions your bot user, reactively when someone misuses one of your app’s commands, or ideally all of the above.
Further Resources
Hopefully this guide was helpful in considering how to design and implement application commands. Below is a couple of follow-up resources you can use:- Application command documentation—I know it’s linked a bunch in this guide, but there’s a reason!
- Help center article on message content intent workarounds
- The DDevs server where you can find API updates, ask questions about developing apps, and connect with other developers