

Overview
This guide will walk you through integrating the Discord Social SDK into a Unity project. By the end, you’ll have a project that can:- Authenticate users with Discord
- Set up logging and status monitoring
- Start the SDK and establish a connection
- Request the number of Discord friends the player has
- Set the player’s rich presence for your game
Prerequisites
Before starting, ensure you have:- Unity 2021.3 or later
Step 1: Create a Discord Developer Team
Before you start, you’ll need to create a developer team on the Discord Developer Portal. This team will be used to manage your Discord applications and SDK integrations. If you already have a team configured, you can skip this step.- Create a developer team on the Discord Developer Portal.
Step 2: Create a Discord Application
- Create a new application on the Discord Developer Portal and assign it to your team.
- Add a redirect URL in the OAuth2 tab:
- For desktop applications:
http://127.0.0.1/callback(this can be changed later). - See
discordpp::Client::Authorizefor more details on setting up more advanced redirect URIs.
- For desktop applications:
- Enable the
Public Clienttoggle in the OAuth2 tab.
Step 3: Enable Discord Social SDK for Your App
Once you’ve created your Discord application, you’ll need to enable the Discord Social SDK for it.- From the Discord Developer Portal, select your newly created application from Step 2.
- In the left sidebar for your app, locate and click the Getting Started link under
Discord Social SDK. - Fill out the form to share details about your game.
- Click
Submitand the Social SDK will be enabled for your application. - Once enabled, you’ll find binaries for the Social SDK under Downloads.
Step 4: Download the Social SDK for Unity
- Click on the Downloads link under the Discord Social SDK section of the sidebar.
- Select the latest version from the version dropdown and download the SDK for Unity.
A Unity sample project is available for download on this page, but we are not going to cover it in this guide. Explore it on your own after you finish this guide!
Step 5: Project Setup
Let’s set up your Unity project to include the Social SDK package and add the necessary objects and scripts to use it.- Create a new 2D project in Unity Hub using Unity version 2021.3 or later
- Either:
- Unzip the zip file in the Unity
Packagesfolder, or - Unzip the zip file and Install Package from Disk. Make sure the folder is in a directory that won’t get moved or deleted as your Unity project will load it from that location.
- Unzip the zip file in the Unity
- In your project add a
Scriptsfolder and create aDiscordManager.csscript - Add the following code to
DiscordManager.cs:
- Add an empty object to the scene (GameObject > Create Empty) called DiscordManager and attach the
DiscordManager.csscript to it - Add a button to the scene GameObject > UI > Legacy > Button
- Add text to the scene GameObject > UI > Legacy > Text
- Position the button and text somewhere visible on the screen
- Attach the button and text to the DiscordManager in the inspector
- Run it!
Troubleshooting
- Make sure the Social SDK package was successfully added to Unity
Mac libdiscord_partner_sdk.dylib Not Opened
Mac libdiscord_partner_sdk.dylib Not Opened
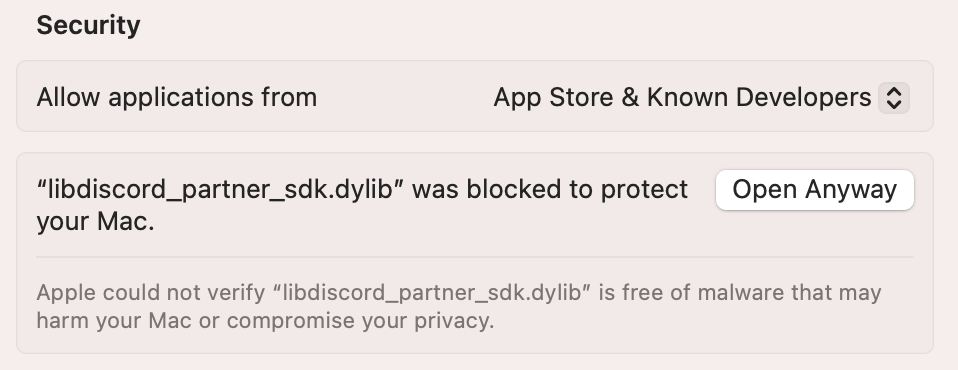
On Mac you may get the error “libdiscord_partner_sdk.dylib” Not Opened because Apple couldn’t verify it. If this happens press Done on the popup.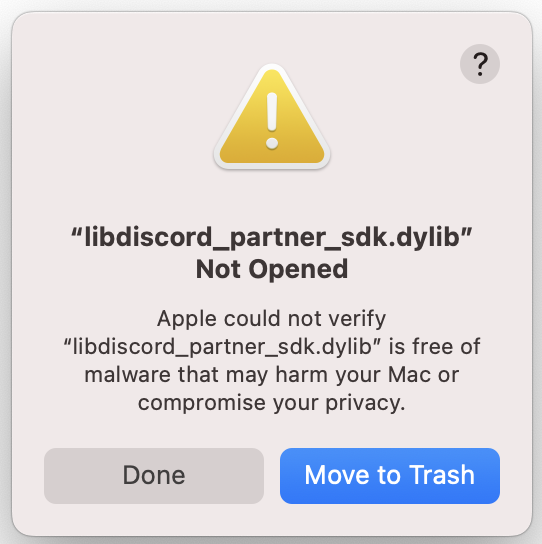 You’ll need to open your System Settings > Privacy & Security and scroll down to the Security section. It will tell you “libdiscord_partner_sdk.dylib” was blocked to protect your Mac. Press Open Anyway and try running again.
 Now when you get the pop up you’ll have the option to select Open Anyway and it will be able to use it successfully.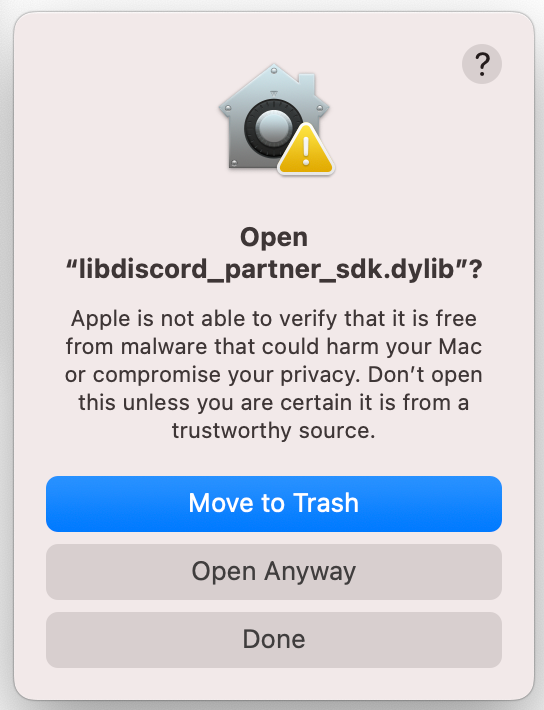
You’ll need to open your System Settings > Privacy & Security and scroll down to the Security section. It will tell you “libdiscord_partner_sdk.dylib” was blocked to protect your Mac. Press Open Anyway and try running again.Now when you get the pop up you’ll have the option to select Open Anyway and it will be able to use it successfully.Step 6: Setting Up SDK Event Handling
Let’s add some event handlers to monitor what’s happening with our Discord connection. We’ll set up two important callbacks:- A logging callback to see what the SDK is doing
- A status callback to know when we can start using Discord features
DiscordManager.cs:
What These Callbacks Do
- The logging callback shows you what’s happening behind the scenes and is a powerful tool for debugging
- The status callback tells you when you’re connected and ready to use Discord features
The Unity plugin handles running the SDK callbacks for you in Unity, no need to use
RunCallbacks like we do in the C++ guide.Most Discord features won’t work until the status is
Ready. The status callback lets you know when you can start using them.Callback Threads and Exceptions
By default, the Unity plugin posts SDK callbacks to Unity’s synchronization context, so they run on the Unity game thread and can safely touch Unity objects. If an SDK callback throws an unhandled exception, the plugin writes it to the Unity console withDebug.LogException.
You can change both behaviors on the plugin’s NativeMethods static class:
NativeMethods.UnhandledException: an event raised when an SDK callback throws an unhandled exception. Subscribe to it to route callback exceptions into your own error reporting.NativeMethods.UseSynchronizationContext: defaults totrue. If set tofalse, callbacks run directly on the thread they originate from, usually an internal SDK client thread. Only consider this if your game dispatches SDK callbacks to its own threads. It is not needed for most games, and callbacks that run off the game thread must not call Unity APIs.
Ready state, we need to authenticate with Discord. Let’s do that next.
Step 7: Account Linking with Discord
In this step, we’ll implement OAuth2 authentication to support account linking with Discord. This process will:- Open the Discord app or a browser window for Discord login
- Get an authorization code
- Exchange it for an access token
- Connect to Discord
Building for mobile? Account linking on iOS and Android works differently. Jump to the Account Linking on Mobile guide to set it up, then come back here to continue.
Building for consoles? Consoles use the device authorization flow rather than a browser redirect. See the Account Linking on Consoles guide to set it up.
Add the Authentication Code
Choosing your OAuth2 scopes: This guide uses
Client.GetDefaultPresenceScopes(), which requests the openid and sdk.social_layer_presence scopes. These enable core features like account linking, friends list, and rich presence.If your game also needs lobbies, voice chat, or direct messaging, use Client.GetDefaultCommunicationScopes() instead.
See the OAuth2 Scopes guide for the full breakdown.DiscordManager.cs:
loginButton.onClick.AddListener(StartOAuthFlow); in your Start() method
What’s Happening Here?
- We create a code verifier for OAuth2 PKCE security
- Set up authorization arguments with your app ID and required scopes
- Start the auth flow with
Client::Authorize, which opens a browser - When authorized, we exchange the code for an access token
Testing It Out
Now, if you press play and click the button, it should start the OAuth flow! You’ll be redirected to your browser to log in and authorize the game. There will be some logging to the console, but the status won’t change yet.Troubleshooting
- Make sure you’ve uncommented
loginButton.onClick.AddListener(StartOAuthFlow);if the button doesn’t seem to do anything - Double check your
ClientIdis correct - Ensure you’ve added the redirect URL in your Discord Developer Portal
- Check the console for specific error messages
DiscordManager.cs up to this point
DiscordManager.cs up to this point
Step 8: Connect the SDK to Discord
Now that we have our access token, let’s connect to Discord! To start, we’ll add this code to yourDiscordManager.cs:
GetTokenFromCode to call these functions when it completes:
What’s Happening Here?
Client::UpdateTokentells the SDK to use our access token for Discord API calls- Once the token is updated, we call
Client::Connectin the callback - The SDK will begin connecting asynchronously
- Our status text will tell you when the SDK is ready!
Testing the Connection
Press play and click the button again to log in and authorize the game. This time you should see the status text change as it goes through the OAuth flow, and it should end upReady
Troubleshooting
If you don’t seeReady status:
- Check that your access token is valid
- Ensure you have internet connectivity
- Look for error messages from the SDK in the console
- Verify your
ClientIDset in the inspector is correct
DiscordManager.cs up to this point
DiscordManager.cs up to this point
Step 9: Access Discord Relationships
Let’s access the user’s Discord relationships (friends list) and display the count. This will help you understand how to access and use Discord data in your game. Lets add some new code to yourDiscordManager.cs:
OnStatusChanged method:
What This Code Does
When the client status isReady, it’ll call our ClientReady function, which will call Client::GetRelationships, returning us a list of all the player’s friends. We then log the number of friends directly to the console.
Testing It Out
Hit play and then click the button. Once the OAuth flow completes and you see the status hitReady check the console to see the output!
Example Output
Troubleshooting
- Verify your OAuth2 scopes include relationships access
- Ensure you’re connected (status is
Ready) - Check that you have friends on Discord
- Look for errors in the logging callback
DiscordManager.cs up to this point
DiscordManager.cs up to this point
Step 10: Set Rich Presence
Let’s show your game’s activity on Discord using Rich Presence. This feature lets players see what others are doing in your game directly in their Discord friends list. Update yourClientReady method with this code:
What This Code Does
- Creates an
Activityobject to represent what the player is doing - Sets basic information like:
- The activity type (Playing)
- Current state (“In Competitive Match”)
- Additional details (“Rank: Diamond II”)
- Updates your rich presence on Discord
Testing It Out
Hit play and then click the button. Once the OAuth flow is complete, you will see the status hitReady. The console will tell you if setting rich presence was successful, and you can check your Discord profile to see it!
Troubleshooting
If you don’t see your presence:- Ensure you’re connected (status is
Ready) - Check the console for error messages
- Verify your activity settings are valid
- Make sure you’re not invisible on Discord
The full DiscordManager.cs
The full DiscordManager.cs
Conclusion
Congratulations! You’ve successfully integrated the Discord Social SDK into Unity. Let’s review what you’ve accomplished:What You’ve Built
- ✅ Created a Discord application and configured OAuth2
- ✅ Set up SDK logging and status monitoring
- ✅ Implemented user authentication flow
- ✅ Retrieved Discord relationships data
- ✅ Added Rich Presence support
Key Concepts Learned
- How to initialize and configure the Discord SDK
- Managing authentication and connections
- Working with Discord’s social features
- Handling asynchronous callbacks
- Monitoring SDK status and events
Next Steps
Social SDK Unity sample
Check out our in depth sample for using the Social SDK in Unity following the best practices laid out in these guides. It contains easy to drop in prefabs with both code and UI to quickly integrate Discord’s social features into your game.
Creating a Unified Friends List
Create a unified friends list combining Discord and game-specific friendships
Setting Rich Presence
Customize your game’s rich presence to show more advanced information and game invites
Managing Game Invites
Allow players to invite friends to join their game session or party.
#social-sdk-dev-help channel for support from the community.
If you encounter a bug while working with the Social SDK, please report it here: https://dis.gd/social-sdk-bug-report